In the expansive realm of WordPress, plugins serve as the backbone of innovation, offering users a myriad of functionalities to elevate their website experiences. One of the key aspects of plugin development involves the strategic implementation of custom settings, tailoring the plugin to meet specific user needs. In this guide, we’ll delve into the process of How to Create Custom Settings Page in WordPress plugin using the robust WordPress Settings API. Let’s embark on this journey to enhance your WordPress website through personalized plugin configurations.
Step 1: Set Up Your WordPress Plugin
To initiate the process, establish a dedicated folder for your plugin within the wp-content/plugins directory of your WordPress website. Within this folder, create the main plugin file, such as ‘webficial-blog-plugin.php.’
Step 2: Add Custom Setting Fields Using WordPress Development Services
In your main plugin file (webficial-blog-plugin.php), leverage the WordPress Settings API to seamlessly integrate custom setting fields. This approach aligns with the best practices observed in WordPress development services. The following code exemplifies the fundamental steps:
<?php
// Register Webficial settings
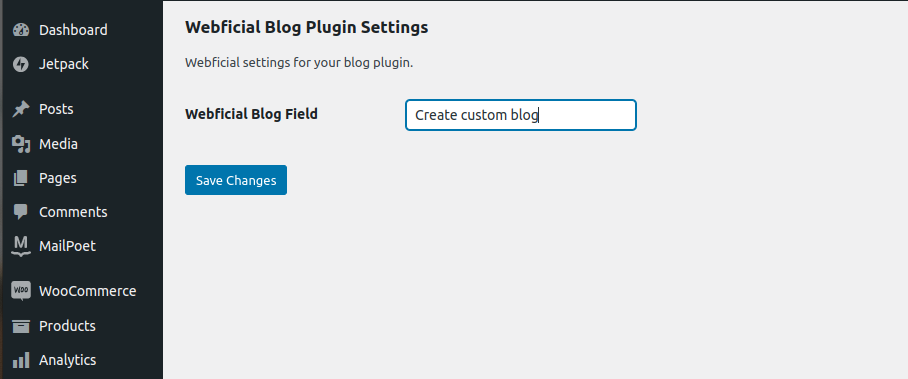
function webficial_blog_plugin_settings() {
// 1. create section
add_settings_section(
'webficial_blog_section', // Slug-name to identify the section. Used in the 'id' attribute of tags.
'Webficial Blog Plugin Settings', // Formatted title of the section. Shown as the heading for the section.
'webficial_blog_section_callback', // Function that echos out any content at the top of the section (between heading and fields).
'reading' // You can choose a different settings page
);
// 2 create a new field to a section of a settings page
add_settings_field(
'webficial_blog_field', // Slug-name to identify the field. Used in the 'id' attribute of tags.
'Webficial Blog Field', // Formatted title of the field. Shown as the label for the field during output.
'webficial_blog_field_callback', // Function that fills the field with the desired form inputs. The function should echo its output.
'reading', // You can choose a different settings page
'webficial_blog_section' // The slug-name of the section of the settings page in which to show the box. Default 'default'.
);
// 3 create. register fields
register_setting(
'reading', // A settings group name
'webficial_blog_field',// The name of an option to sanitize and save.
$args = array() // Data used to describe the setting when registered
);
}
function webficial_blog_section_callback() {
echo '<p>Webficial settings for your blog plugin.</p>';
}
function webficial_blog_field_callback() {
$value = get_option('webficial_blog_field');
?><input type=text id=webficial_blog_field name=webficial_blog_field value=<?php echo $value ?> /><?php
}
add_action('admin_init', 'webficial_blog_plugin_settings');
Here, the WordPress developers can seamlessly integrate custom settings into the Reading Settings page, ensuring a cohesive user experience.
Step 3: Display Custom Setting in Your WordPress Plugin
Retrieve and showcase the custom setting within your plugin using the following code snippet:
					<?php
$webficial_setting_value = get_option('webficial_blog_field');
echo '<p>Webficial Blog Plugin Field Value: ' . esc_html($webficial_setting_value) . '</p>';
Step 4: Save and Retrieve Custom Settings
WordPress handles the saving and retrieving of settings automatically when users save the specified settings page – in this case, the Reading Settings page.
Elevate Your WordPress Website with Custom Settings
As you navigate the intricate process of creating custom settings for your WordPress plugin, envision the transformative impact this customization can have on your WordPress website. By adhering to the principles of WordPress development company standards, you not only enhance the functionality of your plugin but also contribute to a more user-centric WordPress ecosystem.
Why Custom Settings Matter for Your WordPress Website:
Next Steps for Your WordPress Development Company: As a WordPress development company, consider expanding the range of custom settings to accommodate evolving user demands. Dive into more advanced features offered by the Settings API, explore data validation, and implement robust error handling for a foolproof user experience.
This guide serves as a foundation for WordPress developers and WordPress development services to integrate custom settings seamlessly, offering users an unparalleled level of control over their WordPress websites. Thank you for embarking on this journey with us. We hope this guide equips you to elevate your WordPress website through personalized plugin configurations. Stay innovative, keep coding, and continue enhancing the WordPress experience for users worldwide!