In the world of modern web development, the ability to create reusable and shareable components is paramount. Laravel, a popular PHP framework, offers a powerful solution to this challenge through its capability to create custom modules or packages. These modules not only enhance the modularity and maintainability of your projects but also promote efficient collaboration within development teams. In this comprehensive guide, we will walk you through the process of creating custom modules in Laravel, empowering you to craft robust and scalable applications with ease.
Imagine having a set of features that can be seamlessly integrated into any Laravel project, eliminating the need to rewrite code from scratch every time. Custom modules allow you to encapsulate specific functionalities, making them easily reusable and shareable across multiple projects. This approach not only saves time but also ensures consistent quality and reduces the risk of errors.
Make sure you have laravel project and composer installed in this. If not then Open your terminal and run the following command
composer create-project --prefer-dist laravel/laravel LaravelProject
Navigate into your project directory and run below the required command:
composer install
Create .env file at project root and move code from .env.example
cp .env .example.env
Now, configure your database setting in .env file.
					DB_CONNECTION=mysql #Database server name
DB_HOST=127.0.0.1 #Your database server hostname
DB_PORT=3306 #Port if your using
DB_DATABASE=laravel  #Your database name
DB_USERNAME=root #Databse username
DB_PASSWORD=root #Database password
Run below the command to Create APP_KEY in your .env file
php artisan key:generate
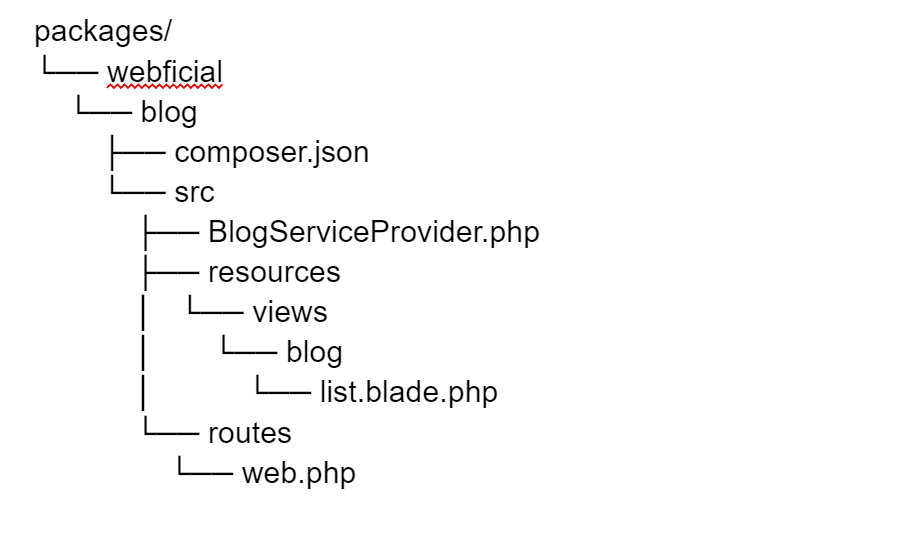
Create ‘packages/vendor-name/package-name’ directory in your laravel root directory.
vendor-name is the name of vendor and package-name is the name of package, you may change the name as per you want.
Info: We can create a custom package in the vendor directory but creating a custom package in {laravelRoot}/package directory is good practice.
Custom Package directory structure
Let’s create a file and folder which is needed in the package.
Create composer.json
Run below the command in your package directory to Create Composer File.
composer init
This will ask some questions to make composer.json file so give answer and after done this it will create composer.json file in your package.
The composer.json file will now look like below.
					{
    "name": "webficial/blog",
    "description": "This is custom blog package",
    "autoload": {
        "psr-4": {
            "Webficial\\Blog\\": "src/"
        }
    },
    "authors": [
        {
            "name": "Jitendra Hengada",
            "email": "info@webficial.com"
        }
    ],
    "require": {}
}
Now, we need to inform Laravel ‘composer.json’ to load our package. Add below code in your project ‘composer.json’. You can change name as per your package name.
					"autoload": {
        "psr-4": {
            "Webficial\\Blog\\": "packages/webficial/blog/src/"
        }
    },
    "autoload-dev": {
        "psr-4": {
            "Webficial\\Blog\\": "packages/webficial/blog/src/"
        }
    },
Now, create src directory in your package and you need to add all files/logic in this directory.
Create serviceProvider class in ‘packages/vendor-name/package-name/src’ directory.
Service providers are the central place of all Laravel application bootstrapping. You can change name of this file as you want.
boot() and register() methods are mandatory in every service provider.
ServiceProvider class should look like below
					<?php

namespace Webficial\Blog;
use Illuminate\Support\ServiceProvider;

class BlogServiceProvider extends ServiceProvider
{
    public function boot()
    {
        /** Give your package’s route path where you can define route */
        $this->loadRoutesFrom(__DIR__.'/routes/web.php');
        /**
		Give your package’s view path where you can add view files
		Second namespace parameter is required which identify your custom view file so you can add this param as you want. When we call view file then we need to pass this namespace ex: ‘Blog::view-file’.
         */
        $this->loadViewsFrom(__DIR__.'/resources/views', 'Blog');
    }

    public function register()
    {
    }
}
Now, in the {laravelRoot}/config/app.php configuration file we need to Register our package’s ServiceProvider file.
					'providers' => [
	/*
     * Application Service Providers...
	*/
	App\Providers\AppServiceProvider::class,
	// … add in last below the our custom package provider
	Webficial\Blog\BlogServiceProvider::class
]
Add following code in ‘packages/vendor-name/package-name/src’ path.
					<?php

use Illuminate\Support\Facades\Route;

Route::get('blogs', function() {
	/** Blog is namespace which we have added in above ServiceProvider. Your view file path will be like:  packages/vendor-name/package-name/src/resources/views/blog/list.blade.php */
	return view('Blog::blog.list');
});
Create view file in resources/views directory as given path in your ServiceProvider loadViewsFrom(). In our case we have to create file in this directory packages/vendor-name/package-name/src/resources/views/blog/list.blade.php Add content in view file which you want to show.
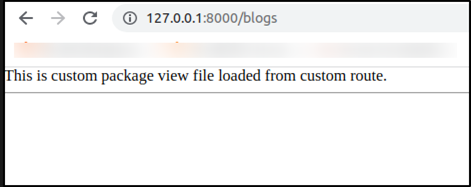
					This is blog list file loaded from custom route.
<hr>
Now, hit ‘http://127.0.0.1:8000/blogs’ url in your browser and you should see something like below.
Creating custom modules in Laravel opens up a world of possibilities for developers seeking to enhance the efficiency and scalability of their applications. With modularity at the core, you can focus on building specific functionalities without the worry of disrupting the entire project. By leveraging this step-by-step guide, you are well-equipped to harness the potential of custom modules, making your Laravel development journey smoother and more productive.
So, why settle for reinventing the wheel? Embrace the power of custom modules and elevate your Laravel projects to new heights of efficiency and collaboration.
Stay tuned for more insightful guides and tutorials to empower your journey in web development!